How To Find The Fifth Sage In Zelda: Tears of the Kingdom
The Legend of Zelda: Tears of the Kingdom is one of the biggest games of the last five years, and its "Find the Fifth Sage" quest exemplifies some of the best things about it. The game is a masterpiece of game development innovation and reimaginations of Zelda classics, so it's no surprise that its quests are as in-depth as they are. While the quest to find the Fifth Sage is complex, it's a story mission that players will not soon forget.
This quest takes place after players have completed the "Regional Phenomena" locations and talked to Zelda after the "Crisis in Hyrule Castle" quest. Once you've gathered all four Sages together, they will mention that one of them is still missing: the Fifth Sage. Talk to Purah, who will start the "Find the Fifth Sage" quest.
Related What Happens To The Master Sword In Zelda: Tears Of The Kingdom It’s long since been confirmed that the Master Sword is broken in TOTK, but just how - and whether it can be repaired - are only revealed in-game.
How To Prepare For The "Find the Fifth Sage" Quest
Start The "Secret of the Ring Ruins" Side Quest
When you talk to Purah in Kakariko Village, she mentions "ruins from the age of legend." This refers to the nearby Ring Ruins, which you should have already visited earlier in TOTK. To complete this quest, you will need the camera function on your Purah pad, so ensure that this function is operational before you head out.
You technically don't need to complete this quest to finish the Fifth Sage quest, but it will make later steps of the quest much easier.
After talking with Purah, climb the scaffolding in front of her and use the Ascend ability to reach the ring ruin she mentioned. Take a picture of the stone slab inside, then return to Purah and show her what you've found. She and Tauro will then leave the area, heading to the Popla Foothills Skyview Tower, where Tauro can be found inside some nearby ruins.
Inside, he will talk about the ruins and the puzzles they hold. Opening the Zonai chest above him will give you the Charged Shirt, the first piece of the Charged armor set. Put it on, and after talking to Tauro again, he mentions something about the armor set being related to dragons somehow, but he's still determining much else.
It's worth noting that Tauro isn't talking about actual dragons, though you can farm Dragons for parts, but rather the Dracozu Lake and River, which form a large serpent shape.
Related All Hinox Locations In Zelda: Tears of the Kingdom A Hinox is an ogre boss found throughout Tears of the Kingdom who drops both ingredients and monster parts. Hinoxes are both above and below ground.
Follow the river and defeat enemies as you go. On your way, you will see a doorway cut into the stone that is blocked off by rocks, which can be cleared by a hammer or any explosives you have on hand. This room contains the Charged Trousers, the second piece of the armor set.
Again, along the way, you will see another stone door blocked by vines. Burn them away and enter the room to find the Charged Headdress. This is the third piece of the Charged armor set. Put on all three pieces of the set, and make your way towards the ruins at the end of the river.
You will see an altar in the ruins ahead. Dropping a Zonai charge here with the outfit on will activate a cutscene and also complete the "Secret of the Ring Ruins" quest. The storm clouds around the sky islands in the southern part of Zelda TOTK's map will clear. Next, head to the Thunderhead Isles via the Popla Foothills Tower and continue with the next bit of the quest.
Thunderhead Isles and Dragonhead Island
Once you arrive at the Thunderhead Isles, climb up to glide back toward Dragonhead Island. In the Island's center, there is a large stone building. Head inside and drop onto the Zelda TOTK's Joku-u Shrine. Burn the vines and head deeper into the Island, and you will reach a door requiring at least ten hearts to open. Open it up and interact with the mask inside to continue your quest.
How To Complete The "Guidance from Ages Past" Quest
Find All Robot Pieces
Once you touch the mask on Dragonhead Island, a laser will shoot out and point to below the island. Pick up the mask, head out through the door that appeared, and make a flying machine with the mask attached anywhere on it to take it with you. Fly to the location the laser is pointing to, take the mask off your flying contraption, and then take it to the pedestal the laser indicates.
Related 10 Incredible Zelda: TOTK Moments We’ll Never Forget What makes the journey of Zelda: Tears of the Kingdom memorable is this set of scenes that stick with you long after finishing the game.
After watching the cutscene, pick the mask back up and place it on another pedestal. Make sure to have plenty of bright blooms with you, as this pedestal will transform into an elevator, taking you to the Depths. A Lightroot will be nearby; grab the mask, activate the Lightroot, and then use Ultrahand to put the mask into the mask-shaped slot in the robot mold nearby.
The next part of the quest is quite long, so buckle in. You must collect all four robot pieces scattered around the area at the abandoned depots that Mineri mentioned. This is where your brightblooms will come in handy; glide down and run up the giant skeleton to the north.
Right Leg Piece Location
You will see the Uisihcoj Lightroot, so pop that to light up the area before heading northeast. You will have to wade through a few enemies before jumping off one of the broken bridges here, where you will fall towards an altar. Activate it to obtain the right leg that Mineru needs. Following the Gamers Heroes below from YouTube above, this piece comes in a box, which you must now transport back to the mold.
Using Ultrahand, put the box onto one of the elevators and activate it to get the box up to the long rail above. Hook the box onto the rail, then grab one of the fans off the elevator and stick it to the box. Finally, turn on the fan, pushing the box up the rails. Keep pushing the box until you reach the top of the ledge, where you will find everything you need to build yet another flying machine. Fly the box back down to the mold and stick the leg inside.
Right Arm Piece Location
Head back up to the top of the ruins like you did before. Jump off and glide west, aiming for an entrance lit by two green lamps. You might need to use Tulin's wind to get there, so be ready to give yourself that extra boost.
To get the right arm in Zelda TOTK, activate the altar like you did before. Use the conveyor belt to send the arm up and head on after it. Here, you will see quite a few building materials you can use to get the box across the chasm.
Following Gamers Heroes' guide above, place the wheels on just one side of the box and sideways on the thunder pillar, ensuring the wheels face the same direction. The box will zip itself over to the other side. Follow it over and use the components on the other side to turn the box into a car. Drive it back to the mold and place the arm inside.
Left Leg Piece Location
To the east of Zelda TOTK's Muokuij Lightroot lies another depot; head there and activate the altar to get the next box for your robot. Again, take a look at the Gamers Heroes guide below for visual help. Place this box in an elevator, turn it on, and send it up. Once the box has arrived, spin the crank to aim the bridge towards an overhead ledge at a pretty steep angle.
With the bridge in place, attach two rockets to the side of the box. Add a steering stick onto the top. Boost up to that ledge, take the box out of the depot with Ultrahand, and place the leg into the mold.
Left Arm Piece Location
This depot is the easiest to reach from the mold. Head southwest on foot to find yet another door marked by two green lanterns. If you're unsure where to go, check out the Gamers Heroes guide. Activate the altar inside to get the arm, then open the door to the side and bring the box through.
On the other side, the door will have two wheels, which you can remove and attach to the box to make a rolling vehicle. Then, you can plop the steering stick onto the top, hop on your car, and drive through the lava.
At the next non-lava stop, take the wheels and move them to the short sides of the box to make a wide car in Zelda TOTK. Then, ride this new, wider vehicle across the lava. At the next door, take one of the wheels off your wide car and attach it to the door the way it was in the first room. Open the door, then attach one of the fans on the other side to the back of the box.
Related Zelda: Tears of the Kingdom - 10 Best Vehicle Builds There are tons of different vehicles Link can craft using Ultrahand and Link can even save his most useful builds for later using Autobuild.
Drop this new creation into the water nearby and activate the fan to send your raft down to the mold. Once it gets there, grab it out and place it in the mold. The robot will pop out, fully formed, and join you on the next steps of the quest.
Mineru's Golem & The Spirit Temple
The Golem is a mountable construct to which you can add weapons, so customize to your heart's content. Follow the quest marker that pops up to the Spirit Temple. This should be a simple journey.
On the way to the Temple, you can pick up a cannon at the Sijotu Lightroot. This cannon will help defeat the boss of this questline, so pick up at least one and attach it to your robot friend. Nearby is a rock wall that you can break using the Golem.
Crossing through that broken rock wall will bring you to another armory, this one containing a stack of rockets. Use the rockets to fly up to the Spirit Temple. Inside the temple, a fight awaits.
How To Beat The Seized Construct Boss
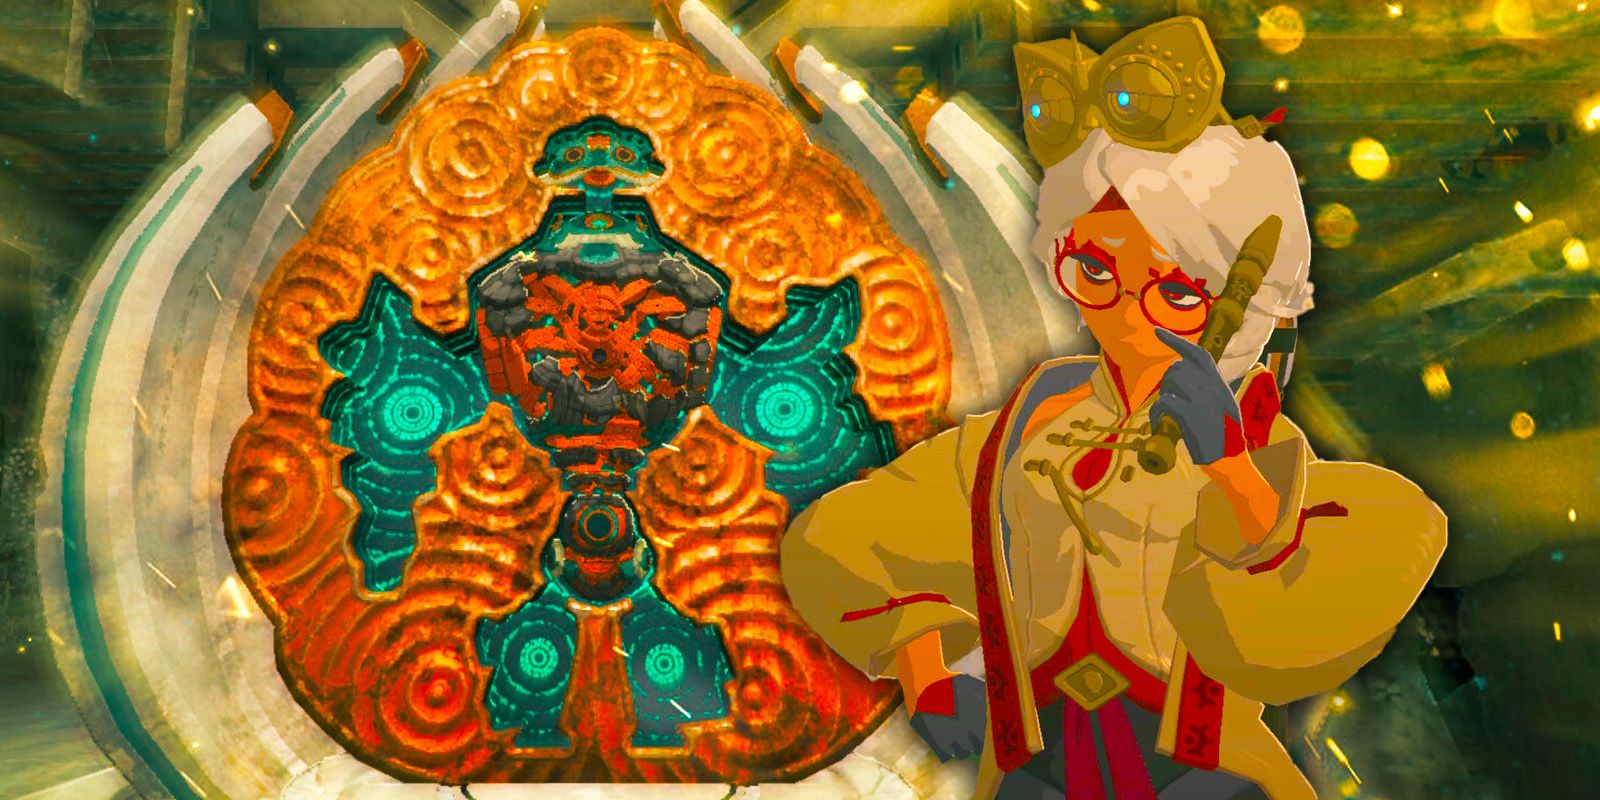
Interact with the statue in the center of the room. On your way in, you will be ambushed by the Seized Construct, a giant robot that can only be taken down using the Golem you've created. This is where that Zonai cannon will come in handy.
Your weapons will do little damage to the Construct; however, you're not using the cannon for weapon damage. Instead, use the cannon to stun the Construct, then smack it into the barbed wire around the arena to blow it up. Once you've gotten the Construct to half health, it will begin to pick up attachments and become able to fly.
Wait until it heads upward, then use your cannon like before to blast it out of the air and into the waiting barbed wire. This strategy should allow you to avoid damage and take care of the Seized Construct relatively quickly. After you've beaten it, head to the stone, finish the temple, and trigger some cutscenes with Mineru.
Complete The "Find the Fifth Sage" Quest
Mineru will want to ensure you've gotten the Master Sword in Zelda TOTK, so if you don't have it, get it. She will give you her Sage ability, which allows you to summon her Construct at will. Head back to Purah with the Master Sword and all your Sage abilities to complete your quest.
As one of the lengthier quests in The Legend of Zelda: Tears of the Kingdom, the "Find the Fifth Sage" quest is surely one to remember. Whether you're playing this game for the first time or revisiting it after a long break, there are plenty of iconic moments that make this game great.
Source: Gamers Heroes/YouTube


COMMENTS